VLC Media Player is a popular platform that supports all types of video or audio files, including high-quality videos. It comes with a simple interface and many advanced features that you can customize accordingly. However, a few users claimed that whenever they play a video in HD quality, the VLC player freezes their videos and lags or shutters continuously.
This could be frustrating for those who want to experience their favorite content on the screen in high quality. If you are one of them, don’t brood. Here, we guide you through how to stop HD videos from freezing while playing in VLC. So, let’s get into it.
Ways to Stop HD Video from Freezing While Playing in VLC
VLC media players can play large video files in high-definition qualities such as 8K, 4K, 1080p, H.265 MP4, etc. If you are trying to play your videos in these video qualities and you encounter an issue with VLC, don’t worry. Below, we have outlined the most effective ways to fix the issue.
1. Reset VLC Settings
If you have accidentally tweaked some changes to your media player settings, it may prevent the video from playing in HD quality like 4K and 1080p. To solve it, you can reset VLC settings to default preferences. Here’s how:
- Open the VLC media player on your computer.
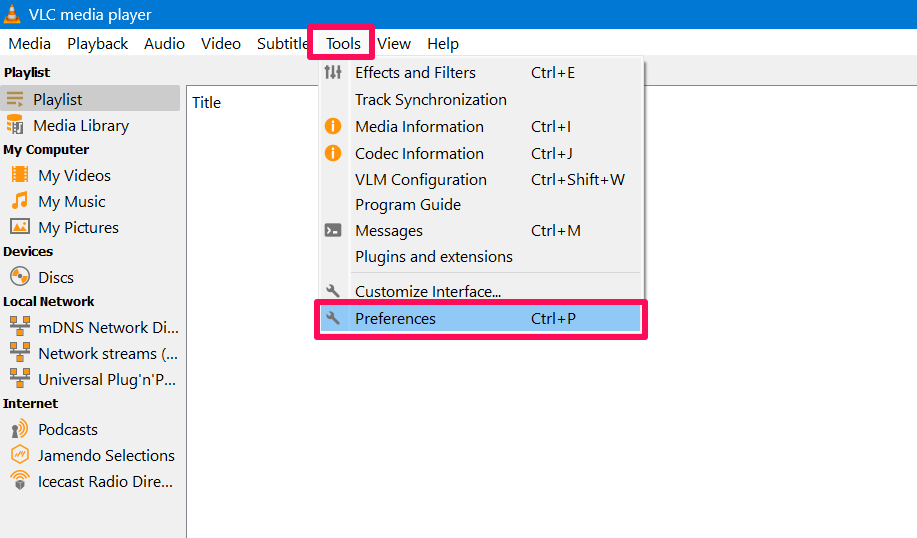
- Click on the Tools option from the top menu bar and choose Preferences. Alternatively, hold the Ctrl + P key simultaneously on the keyboard.
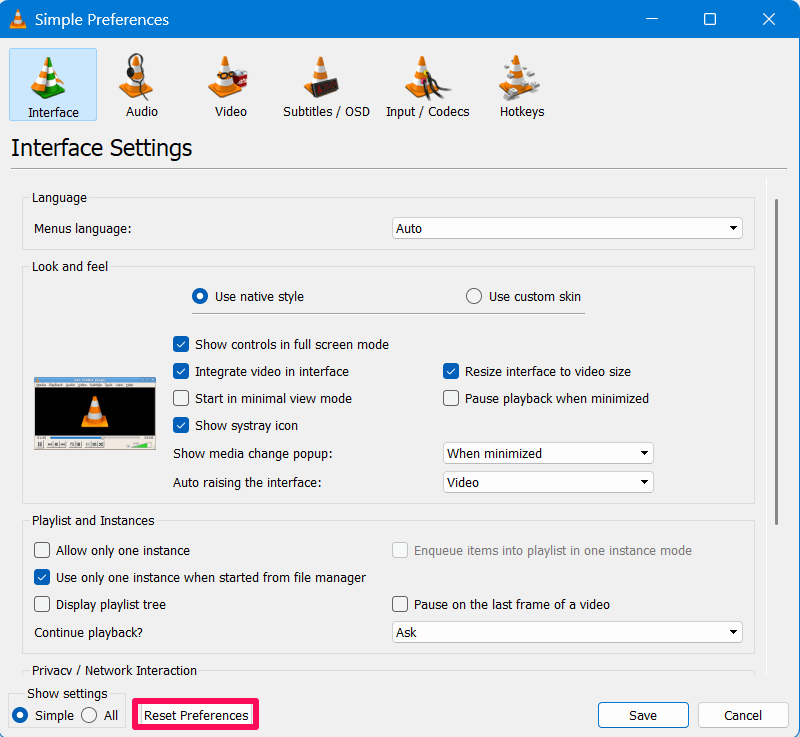
- Under the Simple Preferences window, click on the Reset Preferences option at the bottom.
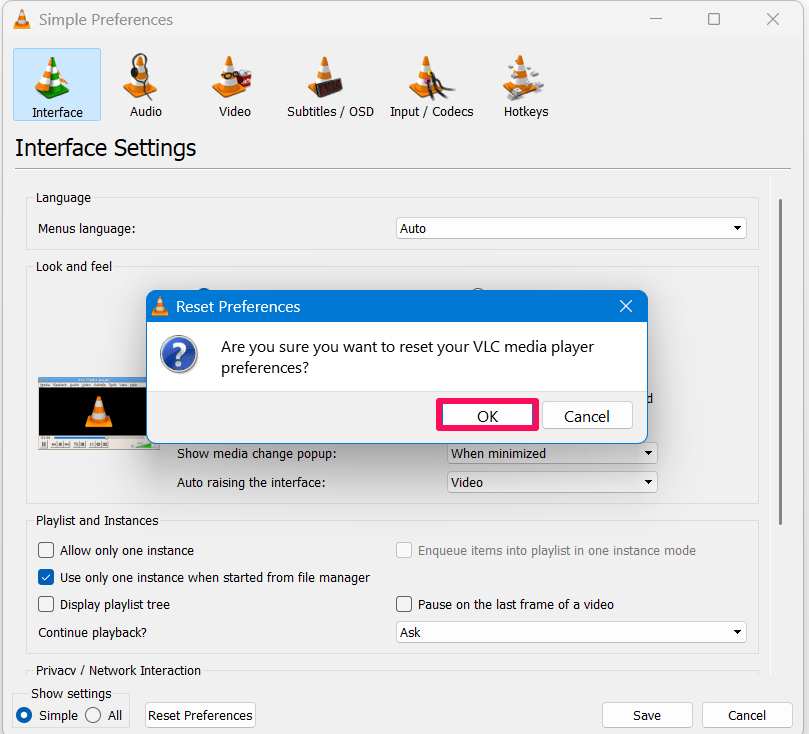
- Now, a dialog window appears to confirm the reset action. You just have to click OK to confirm it.
- Close the VLC player and play the HD video to check whether it’s playing or freezing.
2. Increase Cache Value
Occasionally, you may encounter lags or freezing troubles if the cache values are set to low in the VLC media player. To play the video more smoothly, you need to cache the video from the hard drive to your system’s main memory. It will automatically solve the issue and let you play the video in high quality without any further issues.
Here’s how you can increase the cache value in the VLC media player:
- Open the VLC media player on your computer.
- Click on the Tools tab from the top menu and choose the Preferences option. Alternatively, hold the Ctrl + P key simultaneously on the keyboard.

- In the Simple Preferences window, click on the All option under the “Show settings.”
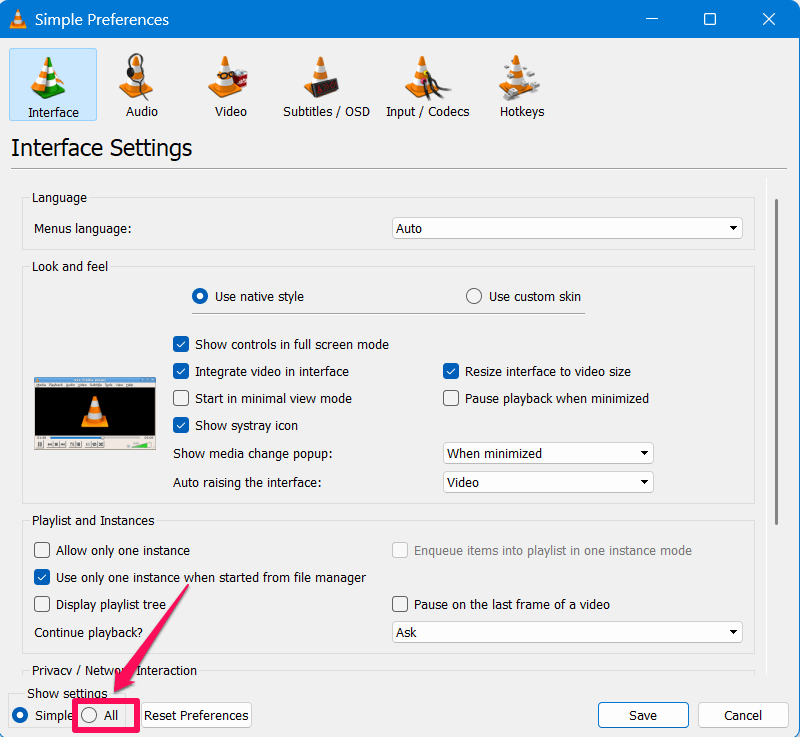
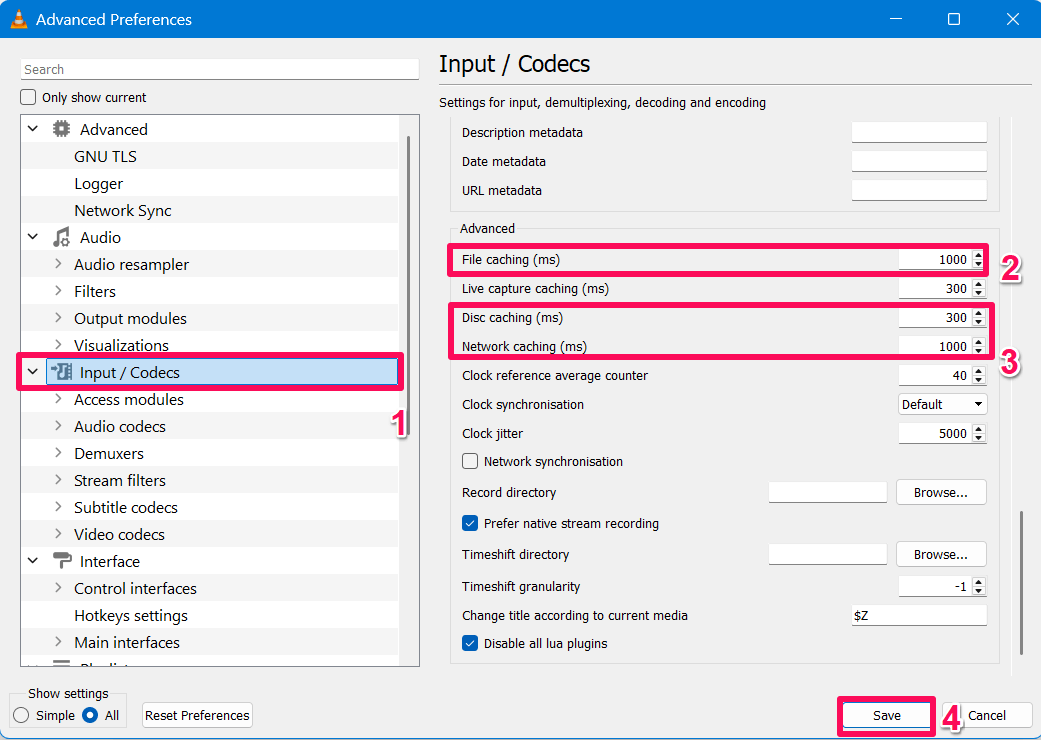
- Then, select the Input/Codecs option and then scroll down to the “Advanced” section on the right side.
- Here, look for the File caching (ms) and change the values to higher values such as 1000 or 2000. However, the value is in milliseconds.
- You can also modify the cache values for “Disc caching (ms)” and “Network caching (ms).”
- Once you made the changes, click on the Save button and play the video in HD quality to verify the results.
3. Change Video Output Settings
If you are still encountering the lagging or freezing issue while playing a video in high quality, you should configure the video output settings. Here’s how:
- Open the VLC media player on your computer.
- Click on the Tools tab from the top menu and choose the Preferences option. Alternatively, hold the Ctrl + P key simultaneously on the keyboard.

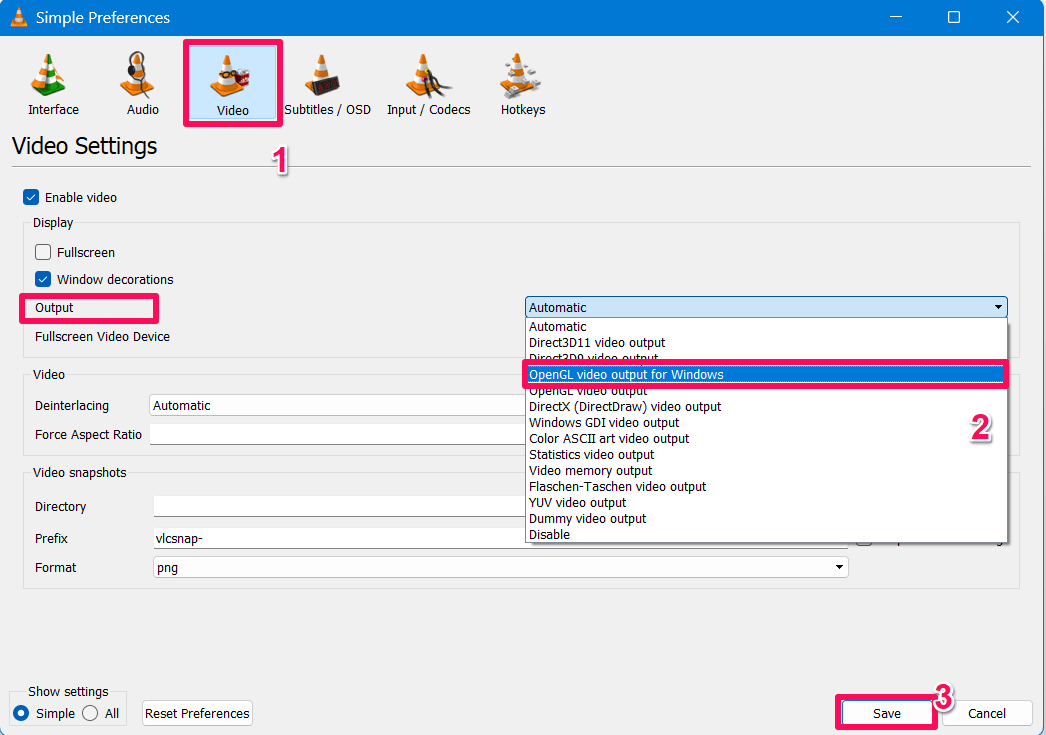
- Now you will get the Simple Preferences window. Select the Video option from the top menu.
- Click on the Output drop-down menu and select “OpenGL video output for Windows or DirectX (DirectDraw) video output.”
- Finally, click the Save button to confirm the changes and try to play the video in HD quality to identify the issue.
4. Update VLC Media Player
VLC media player is developed by the VideoLAN project, and they always try to address occasional issues or bugs for a smooth experience in VLC media player. It might be possible that you’re using the older version of the player and that’s why you’re facing troubles.
It is suggested you update the VLC media player to the latest version to address issues when playing videos in 1080p or 1440p resolution. Therefore, check the updates and install them. Here’s how:
- Open the VLC media player on your computer.
- Click the Help option from the top menu and choose “Check for Updates…”
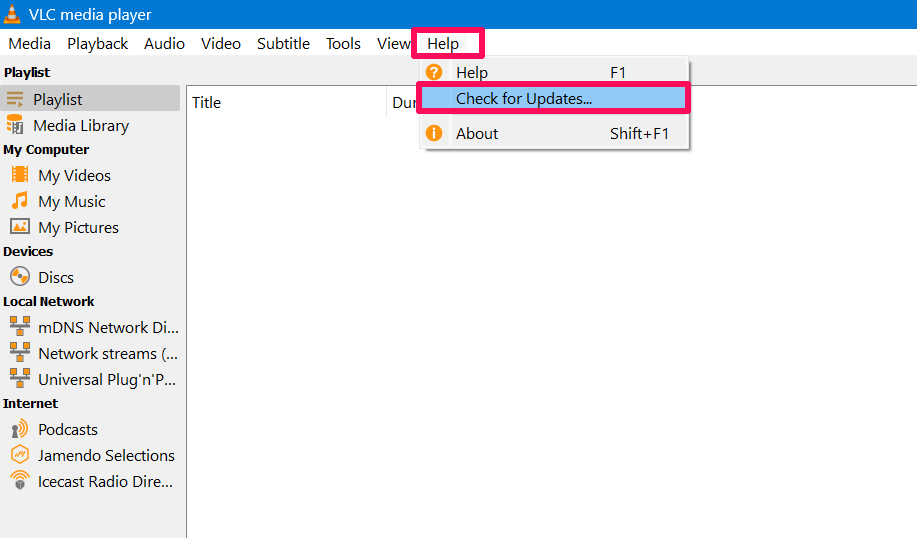
- If any latest update is available, download and install it by following the screen prompts.
5. Disable Hardware Decoding
The next thing you should do is disable Hardware decoding in the VLC player. You can follow these steps to fix the lagging or freezing issue when playing videos.
- Open the VLC player and click on Tools option from the top menu.
- From the pop-up menu, choose Preferences. Alternatively, hold the Ctrl + P key together on the keyboard.

- Click on the “All” option from the “Show settings” section. Now, it will open the other settings.

- Expand the Input / Codecs from the left-side and click the arrow next to Video codecs to expand it.
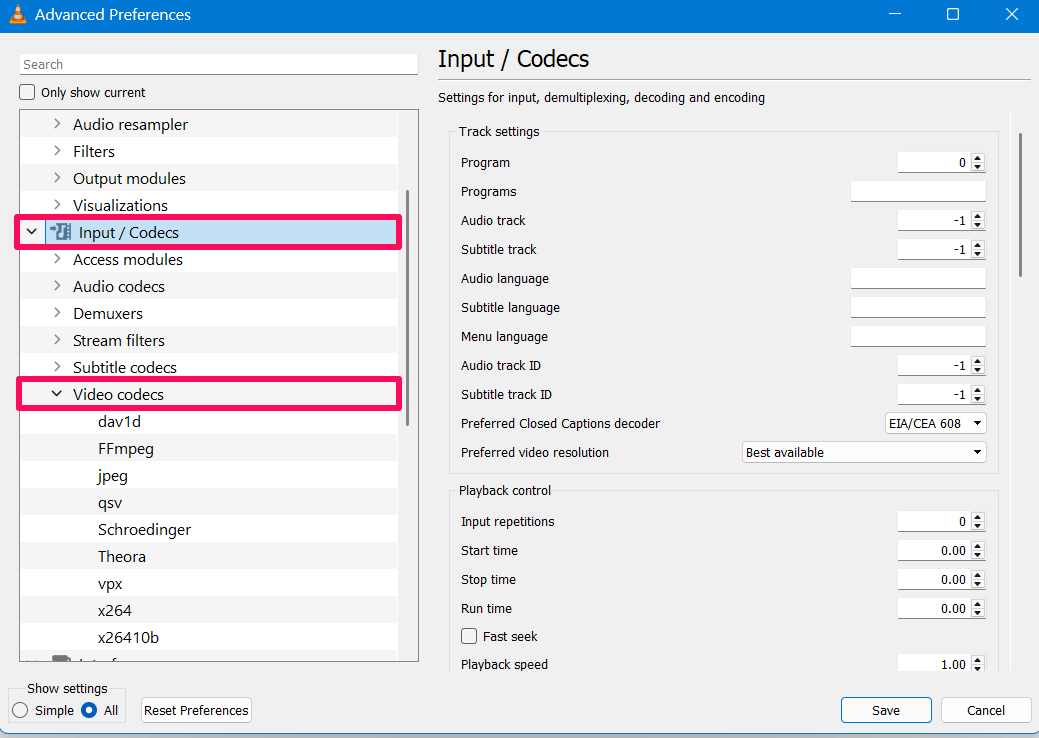
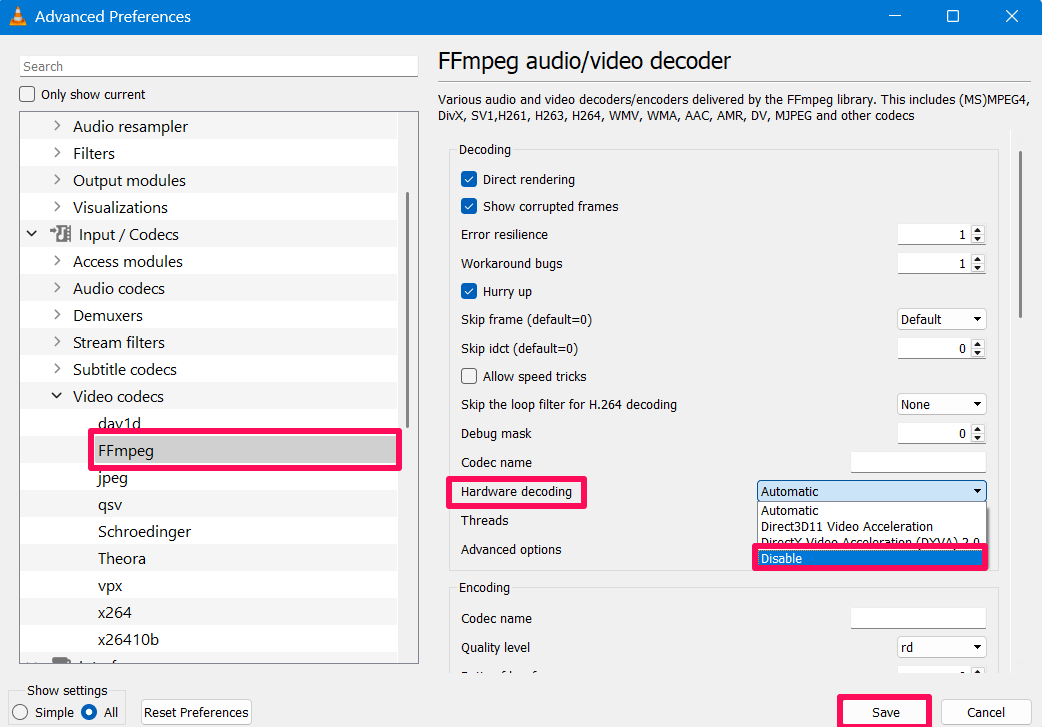
- In the Video codecs list, select “FFmpeg.” Then, click on the Hardware decoding drop-down menu and select the “Disable” option.
- Finally, click on the Save button to confirm the changes.
- Now, play the video in high quality to identify whether the issue has been resolved or not.
6. Change FFmpeg Settings
Last but not least, you can change the FFmpeg settings in the VLC media player. It will help you in resolving the freezing issue when playing HD videos in VLC. Here’s how to change:
- Open the VLC player and click on the Tools option from the top menu.
- From the pop-up menu, choose Preferences. Alternatively, hold the Ctrl + P key together on the keyboard.

- Click on the “All” option from the “Show settings” section. Now, it will open the other settings.

- Expand the Input / Codecs from the left-side and click the arrow next to Video codecs to expand it.

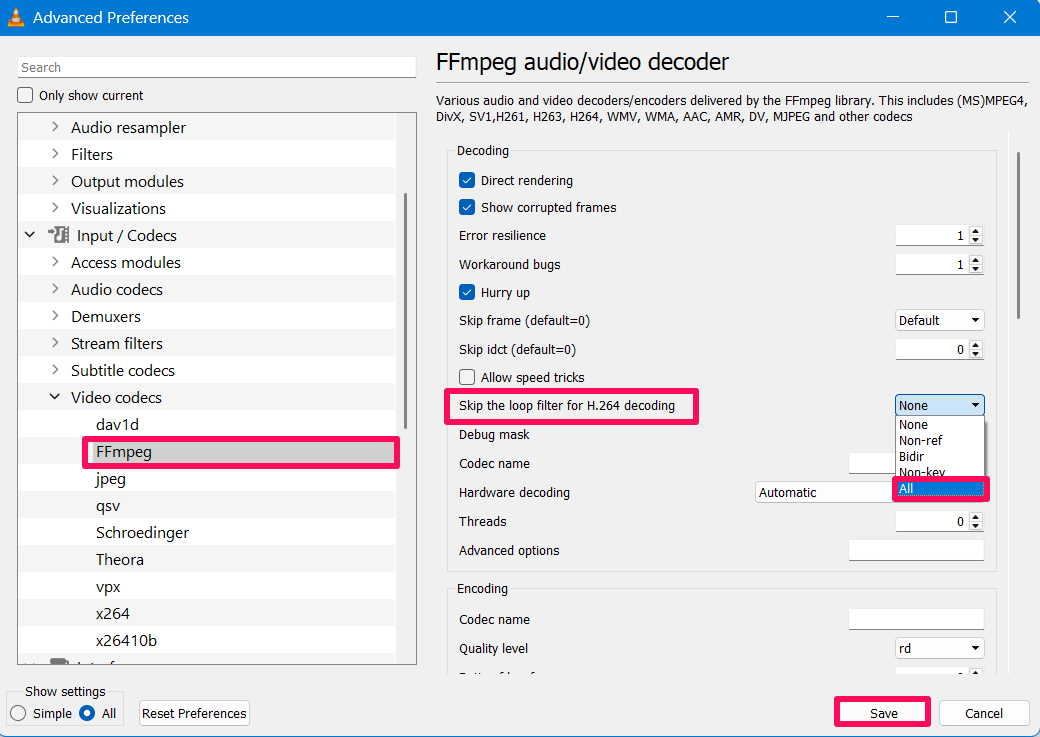
- Under the Video codecs, select the “FFmpeg” option.
- Click on the drop-down menu next to the “Skip the loop filter for H. 264 decoding” and select “All” option from the menu.
- Once done, click on the Save button.
- Now you will be able to play the video in HD quality on the VLC media player without freezing or lagging issues.
Bottom Line
That’s it. This is how you can stop HD videos from freezing while playing in the VLC media player. Even if you are facing issues related to lagging or it’s not playing video anymore, then you can follow the aforementioned methods to fix the problem.
However, it’s always good to keep the VLC media player to the latest version to avoid further issues or bugs in VLC. I hope that this guide was helpful to you. If you have any queries related to the VLC media player, then reach out to us by leaving a comment. Have a good day!
